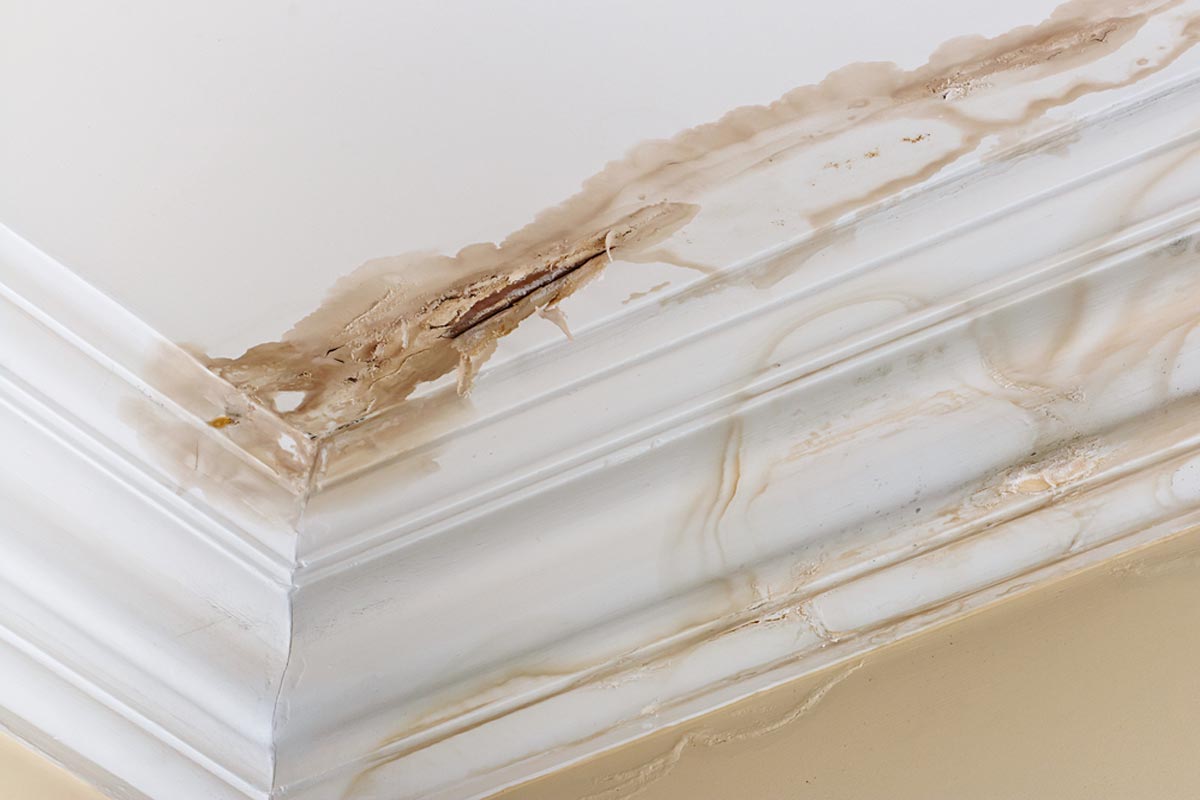
Problems with your roof aren’t always apparent until it’s too late. Of course, when you start to see water stains on your ceiling, you’ll know you have a leak. Even a small leak can quickly cascade into a bigger problem if you don’t consider it an immediate concern. If you think you can repair that tiny leak yourself with caulking, you may find yourself in big trouble later on.
Not all roof leaks have quick fixes. In addition, a major concern is finding the source of the leak in the first place. Only a certified roofing inspector has the proper knowledge and equipment to scope out the origin of the problem.
Attempting to do this yourself almost always leads to overlooking the true source. Not finding the source will lead to expensive problems down the road. These problems can even pose a health risk for your family and include dangerous mold, rotted framing, deterioration of your insulation, and major ceiling damage.
The best way to track down a leak is to go into your attic with a flashlight to look for water stains or signs of mold. Roof penetrations also provide evidence of the leak location. Once you find the general area where you think the leak is, a combination of removing shingles and infrared thermal cameras will reveal the exact site of the leak.
Getting your roof repaired may require specialized techniques, depending on the issue. Call a certified roofer to fix a small roof leak; they will take pictures of the problem and provide a detailed report.
Early Warning Signs
Curling or missing shingle tabs, excessive granules in gutters, and musty attic odors are subtle clues that a leak is developing long before you see a ceiling stain.
Safety First: PPE
If you climb a roof for an inspection, always use a fall-arrest harness, non-slip shoes, and have a spotter on the ground. Missing any of these? Skip the ladder and call a pro.
Document for Insurance
Take date-stamped photos of every stain and drip. Insurance carriers often require proof that you acted promptly to mitigate damage.
Cost Expectations
Minor leak repairs typically run $150–$1,000 depending on roof slope, access, and material. Addressing problems early keeps you on the lower end of that range.
Leaks Through Vent Boots
Many roofs have vent boots made of cheap plastic or metal. The bases on these boots are sometimes made of the same cheap material, leaving them vulnerable to deterioration. Over time, this deterioration could create small openings allowing water to seep through your roof.
Problems with vent boots are a common source of small leaks, and it’s not fixable by simply placing caulking in the spot. In many cases, the vent boot itself might be fine, though the base isn’t. Missing nails around the base can also cause a leak.
Using rubber washer screws, which are typically applied to metal roofs, is a good solution that you can talk to your roofing company about. Your professional roofer will also remove surrounding shingles around the spot to amend the problem. If your pipe boot is beyond repair, we recommend installing a lifetime pipe collar for complete coverage in the future.
Upgrade the Boot Material
Factory-molded EPDM boots last 15–20 years, while lead or silicone models can exceed 30—especially for high-temperature flues.
Use Better Fasteners
Replace roofing nails with #10 hex-head screws that feature oversized neoprene gaskets. They bite into decking, pull the flange tight, and stay watertight.
Seal Under the Flange
Add a bead of high-quality polyurethane roofing sealant beneath the flange before reinstalling shingles to block wind-driven rain.
Plastic Roof Vents
Plastic roof vents are another site that can cause leaks. Along with leaks surrounding vent boots, these will require more than just a simple caulk repair. Cracked housing around plastic vents frequently causes water to seep into your roof. While caulking may provide a temporary fix, it never lasts long in these cases.
You will likely have to replace the entire vent for a complete repair. Similar to the above, missing nails around the base can also cause a major problem. Rubber washer screws are a great item to replace the base nails with and prevent this problem in the future.
Shingles around the vent usually need careful removal to get the screws in place. Your roofer will assess the situation and get your problem fixed as soon as possible.
Switch to Ridge Vent
Where roof pitch allows, swap box vents for a continuous powder-coated aluminum ridge vent. It eliminates plastic parts, improves ventilation, and resists wind uplift.
Choose UV-Resistant Plastics
If box vents remain, upgrade to injection-molded polypropylene rated for UV and impact to avoid the hairline cracks common with builder-grade ABS.
Layer in Waterproofing
Finish installs with butyl flashing tape over the flange and extend underlayment at least 4 inches beyond the cut-out for a second waterproof barrier.
Rusted Step Flashing
If you’re not familiar with what step flashing is, it’s typically used along roofing edges like chimneys and walls to protect against water coming in. It’s used to channel water over shingles so that everything drains appropriately. As with many roofing materials, its life span is about 10 years.
After typical wear, step flashing may rust or crack. This damage is usually exaggerated when exposed to extreme weather. When damage occurs, the flashing needs to be replaced as soon as possible. To replace step flashing, your roofer will remove shingles and pry all siding loose to remove the old flashing. Never attempt to do this on your own, as you can seriously damage your home’s exterior, leading to potential damage to your home’s interior. If you attempt to apply a waterproofing sealant on your own, keep in mind that no sealant lasts more than a few weeks before leaks will reappear.
Follow Code Piece by Piece
Building code calls for a separate piece of step flashing for every shingle course—about every 5–6 inches vertically. One long “L”-flashing strip is a leak waiting to happen.
Select Durable Metals
Use 26-gauge galvanized steel, aluminum, or copper for coastal homes. Pair them with stainless steel nails to prevent dissimilar-metal corrosion.
Layer Membranes Correctly
Apply a peel-and-stick ice-and-water membrane against the wall, then weave each step-flashing piece behind housewrap before renailing siding.
Old Mounting Holes in Your Roof
Have you had a satellite dish or antenna mounted on your roof in the last decade? The mounting brackets likely left small holes in your shingles that you never noticed before. These small holes can easily cause small leaks, which you may only notice after seeing water spots on your ceiling.
You may feel tempted to climb on your roof and simply fill these small holes with caulking. As mentioned above, this doesn’t hold long. A roofer will likely have to place flashing over the small holes for repair, depending on where the holes are. Oftentimes, you will have to replace a few shingles to fully solve the issue.
What’s important is to have a certified roofer thoroughly inspect your roof since old mounting holes are often too small to notice.
Repair Damaged Decking
Rusty fasteners can enlarge a pinhole into a half-inch cavity. A pro will cut out soft plywood, splice in new decking, and bridge the seam with self-adhering underlayment.
Inspect Fascia for Rot
If the penetration is near a rafter tail, the fascia board may be rotting. Address hidden damage before it spreads.
Rethink Future Mounts
Whenever possible, place satellite dishes on a gable-end mount or a non-penetrating tripod weighted with cinder blocks.
Dormer Wall Issues
For homes with a second floor, dormer walls are a common source of small roof leaks. Dormers channel water into corner boards, window edges, and siding. When the caulking is worn around these spots, water can quickly cause major problems, especially when you have frequent wind-driven rainstorms.
What’s sometimes misleading is that caulking around these spots can appear to look intact when it really isn’t. Your professional roofer will have to use a putty knife to make sure the caulking is truly sealed. If they suspect the caulking isn’t any good, they will completely remove it and replace it with something more solid, like latex caulk.
They will also look at your siding to see if it needs replacing. Siding can easily get cracked or begin to rot when your roof is not repelling water properly. In addition, flashing may need replacing in spots around dormers.
Install Kick-Out Flashing
A small diverter flashing where the roof edge meets a wall channels water into gutters instead of behind siding.
Prioritize Housewrap
Caulk is only a secondary defense. A properly layered weather-resistant barrier (WRB) should lap over step flashing to keep water outside the wall assembly.
Upgrade Trim Materials
Replace wood corner boards with PVC or fiber-cement to eliminate moisture-wicking and rot.
Damaged or Missing Shingles
Bald spots or lifted tabs often indicate wind damage across the entire course. A technician will lift surrounding shingles, replace the damaged piece with a color-matched shingle, and secure it with four galvanized nails.
Before leaving, they’ll reseal every lifted edge with asphalt roof cement so gusty winds can’t peel back your fresh repair.
Clogged Gutters and Ice Dams
Clean Gutters Regularly
Water that can’t drain will back up beneath shingles. Keep gutters debris-free and correctly sloped—especially before winter.
Insulate and Ventilate
In snow regions, pair R-49 attic insulation with continuous ridge and soffit vents. A cold roof deck discourages the freeze-thaw cycles that create ice dams.
When to Call a Professional vs. DIY
Call a Pro When:
- The leak is within 3 feet of an electrical line, skylight, or chimney.
- Your roof pitch exceeds 6:12 (about 26.5°).
- You can’t trace the leak after 15 minutes in the attic with a flashlight.
- Shingle color-matching is required to maintain HOA compliance.
If any of these apply, put the ladder away and dial a licensed roofing contractor.
Preventative Maintenance Checklist
- Inspect the attic for stains each season change.
- Clear gutters twice a year—or more often if trees overhang the roof.
- Trim back branches so nothing touches the shingles.
- Schedule a professional roof inspection every two to three years (yearly for cedar or tile).
- Keep a photo log of all repairs so future crews know what’s been updated.
As you can see, small leaks aren’t always simple jobs. Here at BRAX Roofing, we’re here to help you find the source of your leak and provide repairs when necessary.
Contact us if you’re experiencing a roof leak. Our experienced staff will schedule inspections and repairs on your schedule.
Proactive maintenance not only extends roof life but also preserves most manufacturer warranties—many asphalt-shingle warranties require documentation of periodic inspections.
Whether you need an emergency tarp tonight or a full re-roof next season, BRAX Roofing’s certified installers have you covered with transparent quotes and industry-leading workmanship guarantees.